Vue原理解析

Vue原理解析

##Vue原理
采用Object.defineProperty() 数据劫持,和发布-订阅者模式,实现双向绑定

  1. 通过建立虚拟dom树document.createDocumentFragment(),方法创建虚拟dom树。
  2. 一旦被监测的数据改变,会通过Object.defineProperty定义的数据拦截,截取到数据的变化。
  3. 截取到的数据变化,从而通过订阅——发布者模式,触发Watcher(观察者),从而改变虚拟dom的中的具体数据。
  4. 最后,通过更新虚拟dom的元素值,从而改变最后渲染dom树的值,完成双向绑定

##数据拦截简单实现
Object.defineProperty() 方法会直接在一个对象上定义一个新属性,或者修改一个对象的现有属性, 并返回这个对象。
语法:Object.defineProperty(obj, prop, descriptor)

$(function (param) { 
        var obj = {};
        Object.defineProperty(obj,'hello',{
            get: function () { 
                //执行obj.hello 时,拦截到了数据
                console.log("调用了getter方法");
             },
             set: function (newValue) { 
                     // 执行obj.hello = 'hello world',拦截到数据
                 console.log("调用setter方法");
              }
        });
        obj.hello;
        obj.hello = 'hello world';
     })
     对其更底层对象属性的修改或获取的阶段进行了拦截(对象属性更改的钩子函数)。

tomcat-load
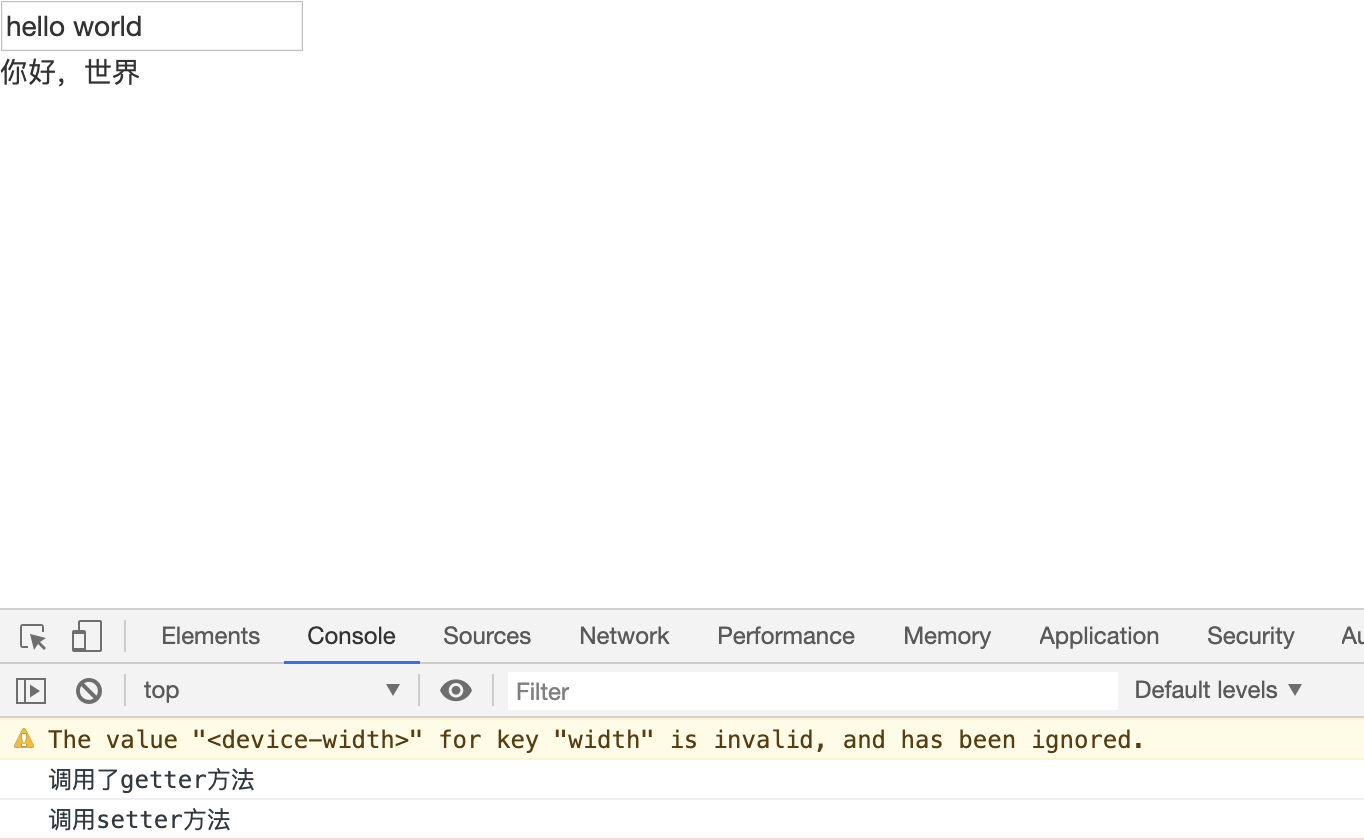
在数据拦截的基础上,可以做到数据的双向绑定

1
2
3
4
5
6
7
8
9
10
11
12
13
14
15
16
17
18
19
20
21
22
23
24
25
26
27
28
29
<body>
<div id="mvvm">
<input type="text" id="test"/>
<div id="test1"></div>
</div>
</body>
<script>

$(function (param) {
var obj = {};
Object.defineProperty(obj,'hello',{
get: function () {
console.log("调用了getter方法");
},
set: function (newValue) {
console.log("调用setter方法");
document.getElementById('test').value = newValue;
document.getElementById('test1').innerHTML = newValue;
}
});

// obj.hello;
obj.hello = 'hello world';
$('#test').bind('input',function (e) {
obj.hello = e.target.value;
})
})

</script>

##了解了基本组成原理了,现在开始实现一个Vue
1:创建Vue的虚拟节点容器

1
2
3
4
5
6
7
8
9
10
11
12
13
14
15
16
17
18
function nodeContainer(node, vm, flag){
var flag = flag || document.createDocumentFragment();
var child;
while(child = node.firstChild){
//编译
compile(child, vm);
flag.appendChild(child);
if(child.firstChild){
// flag.appendChild(nodeContainer(child,vm));
nodeContainer(child, vm, flag);
}
}
return flag;
}

// 1: while(child = node.firstChild)把node的firstChild赋值成while的条件,可以看做是遍历所有的dom节点。一旦遍历到底了,node的firstChild就会未定义成undefined就跳出while。
// 2: document.createDocumentFragment();是一个虚拟节点的容器树,可以存放我们的虚拟节点。
// 3: 上面的函数是个迭代,一直循环到节点的终点为止。

##Vue 初始方法编译

1
2
3
4
5
6
7
8
9
10
11
12
13
14
15
16
17
var demo = new Vue({
el: 'mvvm',
data: {
text: 'hello world'
}
});

function Vue (options) {
//获取到传入的data
this.data = options.data;
//获取到Vue实例的 el id
var id = options.el;
//创建该Vue实例的虚拟dom节点并编译
var dom = nodeContainer(document.getElementById(id),this);
//把生成的虚拟节点增加到真是的节点下
document.getElementById(id).appendChild(dom);
}

##编译

1
2
3
4
5
6
7
8
9
10
11
12
13
14
15
16
17
18
19
20
21
22
function compile(node, vm){
var reg = /\{\{(.*)\}\}/g;//匹配双绑的双大括号
if(node.nodeType === 1){
var attr = node.attributes;
//解析节点的属性
for(var i = 0;i < attr.length; i++){
if(attr[i].nodeName == 'v-model'){
var name = attr[i].nodeValue;
node.value = vm.data[name];//讲实例中的data数据赋值给节点
//node.removeAttribute('v-model');
}
}
}
//如果节点类型为text
if(node.nodeType === 3){
if(reg.test(node.nodeValue)){
// console.dir(node);
var name = RegExp.$1;//获取匹配到的字符串
name = name.trim();
node.nodeValue = vm.data[name];
}
}
代码解释:当nodeType为1的时候,表示是个元素。同时我们进行判断,如果节点中的指令含有v-model这个指令,那么我们就初始化,进行对节点的值的赋值。
如果nodeType为3的时候,也就是text节点属性。表示你的节点到了终点,一般都是节点的前后末端。我们常常在这里定义我们的双绑值。此时一旦匹配到了双绑(双大括号),即进行值的初始化。
至此,我们的Vue初始化已经完成。

##Vue响应式声明
定义Vue中data属性的响应式声明

1
2
3
4
5
6
7
8
9
10
11
12
13
function defineReactive(obj,key,value){
get:function(){
console.log('get 了值'+value);
return value;
},
set:function(newValue){
if(value === newValue){
return ; //值没有改变直接返回
}
value = newValue;
console.log('set 改变了值 '+value);
}
}

用observer 方法,循环调用响应式方法,为data中的每个值增加响应

1
2
3
4
5
function observer(obj,vm){
Object.keys(obj).forEach(function(key){
defineReactive(vm,key,obj[key]);
})
}

初始化Vue

1
2
3
4
5
6
7
8
9
10
11
12
13
function Vue(options){
this.data = options.data;
var data = this.data;
//调用observer给data中每个属性增加响应式
observer(data,this);
var id = options.el;
//获取当前dom实例
var nDom = document.getElementById(id);
//创建虚拟dom容器
var newDom = nodeContainer(nDom,this);
//把虚拟dom渲染上去
document.getElementById(id).appendChild(newDom);
}

编译时找到v-module时去监听

1
2
3
4
5
6
7
8
9
10
11
12
13
14
15
16
17
18
19
20
21
function compile(node, vm){
var reg = /\{\{(.*)\}\}/g;
if(node.nodeType === 1){
var attr = node.attributes;
//解析节点的属性
for(var i = 0;i < attr.length; i++){
if(attr[i].nodeName == 'v-model'){

var name = attr[i].nodeValue;
-------------------------//这里新添加的监听
node.addEventListener('input',function(e){
console.log(vm[name]);
vm[name] = e.target.value;//改变实例里面的值
});
-------------------------
node.value = vm[name];//讲实例中的data数据赋值给节点
//node.removeAttribute('v-model');
}
}
}
}

##订阅–发布者模式
在发布者发布消息时,所有的订阅者可以收到消息

1
2
3
4
5
6
7
8
9
10
11
12
13
14
15
16
17
18
19
20
21
22
23
24
25
26
27
28
29
30
31
32
//定义三个订阅者
var sub = {
update: function(){
console.log(1);
}
}
var sub1 = {
update: function(){
console.log(2);
}
}
var sub2 = {
update: function(){
console.log(3);
}
}

//在声明一个发布者去发布消息,然后去出发订阅者
function Dep(){
this.subs = [sub,sub1,sub2];
}
//给Dep原型链增加通知方法
Dep.prototype.notify = function(){
//循环所有订阅者,执行订阅者update方法
this.subs.forEach(function(value){
value.update();
})
}

//调用
Dep dep = new Dep();
dep.notify();

###重点要实现的是:如何去更新视图,同时把订阅——发布者模式进去watcher观察者模式?

##观察者模式
定义订阅者

1
2
3
4
5
6
7
8
9
10
11
12
13
14
function Dep(){
this.subs = [];
}
Dep.prototype ={
add:function(sub){//这里定义增加订阅者的方法
this.subs.push(sub);
},
notify:function(){//这里定义触发订阅者update()的通知方法
this.subs.forEach(function(sub){
console.log(sub);
sub.update();//下列发布者的更新方法
})
}
}

定义发布者(观察者)

1
2
3
4
5
6
7
8
9
10
11
12
13
14
15
function Watcher(vm,node,name){
Dep.global = this;//这里很重要!把自己赋值给Dep函数对象的全局变量
this.name = name;
this.node = node;
this.vm = vm;
this.update();
Dep.global = null;//这里update()完记得清空Dep函数对象的全局变量
}
Watcher.prototype.update = function(){
this.get();
this.node.nodeValue = this.value;//这里去改变视图的值
}
Watcher.prototype.get = function(){
this.value = this.vm[this.name];//这里把this的value值赋值,触发data的defineProperty方法中的get方法!
}

以上需要注意的点:

  1. 在Watcher函数对象的原型方法update里面更新视图的值(实现watcher到视图层的改变)。

  2. Watcher函数对象的原型方法get,是为了触发defineProperty方法中的get方法!

  3. 在new一个Watcher的对象的时候,记得把Dep函数对象赋值一个全局变量,而且及时清空。至于为什么这么做,我们接下来看。

    1
    2
    3
    4
    5
    6
    7
    8
    9
    10
    11
    12
    13
    14
    15
    16
    17
    18
    19
    20
    21
    function defineReactive (obj, key, value){
    var dep = new Dep();//这里每一个vm的data属性值声明一个新的订阅者
    Object.defineProperty(obj,key,{
    get:function(){
    console.log(Dep.global);
    -----------------------
    if(Dep.global){//这里是第一次new对象Watcher的时候,初始化数据的时候,往订阅者对象里面添加对象。第二次后,就不需要再添加了
    dep.add(Dep.global);
    }
    -----------------------
    return value;
    },
    set:function(newValue){
    if(newValue === value){
    return;
    }
    value = newValue;
    dep.notify();//触发了update()方法
    }
    })
    }
    这里有一点需要注意:
    在上述圈起来的地方:if(Dep.global)是在第一次new Watcher()的时候,进入update()方法,触发这里的get方法。这里非常的重要的一点!在此时new Watcher()只走到了this.update();方法,此刻没有触发Dep.global = null函数,所以值并没有清空,所以可以进到dep.add(Dep.global);方法里面去。
    而第二次后,由于清空了Dep的全局变量,所以不会触发add()方法。

紧接着在text节点new Watcher的方法来触发以上的内容:

1
2
3
4
5
6
7
8
9
10
11
12
13
//如果节点类型为text
if(node.nodeType === 3){

if(reg.test(node.nodeValue)){
// console.dir(node);
var name = RegExp.$1;//获取匹配到的字符串
name = name.trim();
// node.nodeValue = vm[name];
-------------------------
new Watcher(vm,node,name);//这里到了一个新的节点,new一个新的观察者
-------------------------
}
}

全剧终。